well, it’s done…

… the ‘when will this ever be finished’ wall hanging for City & Guilds Patchwork & Quilting is now finished!

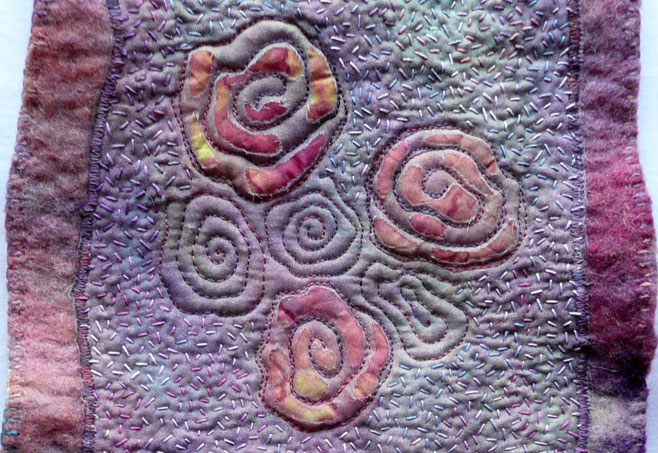
This was my first experiment using felt as the batting so it became an integral part of the design. The assessment was to make a piece using appliqué techniques. It has three layers – painted silk organza, handmade felt, and painted silk pongee. The shadow appliqué shapes are hand dyed cotton and hand painted silk, and the machine and hand quilting are in cotton.

I cut back the top layer of some of the shadow appliqué and machine quilted areas after quilting them. I finished the edges with buttonhole stitch and then needlefelted them to break down the stitches into the felt. The support is a piece of driftwood I found on the beach, and the work is 53cm x 78cm (or 76cm x 78cm if you include the wood).

applique hanging

applique detail

applique detail

applique detail

applique detail

TIF Challenge February 2

I’ve been overtaken by life for the last couple of weeks – this weekend was the first chance I had to get back to the TIF Challenge for February, and February is nearly over! I was thinking about joining fragments of fabric like fragments of memory, so I got out a pile of fabric saved from clothes I’ve worn to pieces over the last 30 years or so and tore a small square of each. Then I looked at several kinds of insertion stitches from Mrs Christie’s Samplers and Stitches, the book my grandmother used. Laced, twisted, knotted – how I struggled! Learning stitches from diagrams doesn’t come easily to me. I double checked the moves in one of the first embroidery books I ever got, back in 1984 (Needlework School by the Practical Study Group), but still I struggled.

In the end, I worked out how to do one stitch – buttonhole insertion stitch using a Tailor’s buttonhole – which is the same as buttonhole stitch but with an extra knot in the formation. I was jubilant when I got the hang of this!

buttonoholeinsertion.jpg
tailorsbuttonhole.jpg

I stitched the pieces together on a background fabric that was also an old shirt of mine, then cut away the background. It was something like shot viscose – another time I would use a natural fabric that would fray well. I managed to cut through one or two of the insertion stitches as I cut it away as well 🙁

stitched sample

I’m not sure if this sample will be the final piece or not – I’ll tell you on the 29th! I’d like to do another version on a different background, maybe a dark silk. I’d like to try a variation on vanishing fabric with machine insertion stitching. And I would love to master some more of those tricky hand stitches…

TIF Challenge January 4 – finished

Thank you for your comments, it wasn’t quite clear to me where it was going or what choices I should make, and I was a bit surprised by the direction things took today. I decided to use plastic netting (from a veggie bag) over the weaving in the end and this was what it looked like after that was stitched down. The weft is a Colinette Giotto yarn.

woven circle

When I took it off the loom it looked like a big flower.

off the frame

I began twisting the pairs of warps to secure the weaving and as I twisted them the circle formed itself into a shallow bowl shape – that wasn’t what I was expecting at all. I haven’t tried the circular weaving before so it was a case of fools rushing in… There was no way it was going to lie flat so I decided to let it take the lead and become a kind of vessel! Here I’ve started to twist coloured hemp yarn with the wire strands. (The crochet hooks are to wind the ‘tendrils’ round.)

twisting wire and hemp

Once all the strands were twisted I began to wind the tendrils.

winding tendrils

This is it finished, from the top and from the side, it’s about 14cm across.

finished piece

finished piece

I learned a lot about the materials from doing this challenge, and about the value of sampling and experimenting. I really enjoyed the process, and the challenge of thinking visually about a concept.

There are lots of blog links to other people participating in this challenge here and here, plus the Flickr photo pool, and the Take it Further Challenge blog. There is an amazing range of work, I’ve been fascinated throughout January to see ideas and interpretations unfold in so many different ways. I wonder what February will bring?

TIF Challenge January 3

I spent some time this weekend sampling and exploring my ideas – I was planning to stop with the visual journal and not make a textile piece but one is emerging anyway. Here I’ve tried out some ways of representing the darkness. (The idea I’m starting from is admiration of people who’ve “confronted their particular darkness by allowing something bright and fierce and tender and courageous to grow in their lives”.)

samples of darkness

samples of darkness

I found that hemp yarn, though difficult to knit with, leaves behind lovely curls and tendrils when you unravel the knitting.

tendrils

I decided to weave a base fabric of colour and brightness, and I think I’ll use an overlay of painted scrim or plastic netting for the element of darkness. Painted with acrylic or ink it keeps a shape and can be shades of black and grey – I want it to net itself over the coloured fabric like some dark, strangling thing – it should have an ugliness yet the overall effect be one of beauty. I’d like to use the plastic netting because it has intrinsic destructive qualities in the environment, the way it literally overwhelms living creatures. But I think the scale of it is too big. I have smaller nets but they’re more stiff and difficult to distort and I want the darkness to gather in some parts and be stretched thin in others. I should play around with that a bit more, but time is short….

This is the beginnings of my fabric. The warp is wire, and I plan to use the ends to form tendrils of colour growing out from the centre, through the netted darkness, an affirmation.

beginning to weave

blockprinting

The project I’m working on now in my OCA Textiles 1 course is all about printing and fabric painting techniques. I’ve been carving print blocks from erasers and corks, cutting them from compressed sponge, and impressing them into thermoplastic foam. The paint is acrylic mixed with textile medium.

block prints

I’ve also been experimenting with stencils/masks and silk painting. Just playing and learning. I wish I could spend a bit longer on this but I’ve already extended my deadline once! By next weekend I need to have spent 10 hours designing and printing a short length of fabric for an assignment. It’s a little paradoxical – I’m doing the course to motivate myself, and I know if I weren’t doing it I probably wouldn’t have spent any time this weekend working with fabric and paint. Yet I’m getting frustrated because the time pressure is stopping me from really exploring the techniques.

This was Markal paintsticks brushed over the edges of a heart shaped mask.

masked shapes with Markal

For this sample I sponged colour over hole reinforcement stickers stuck to the fabric, left it to dry, then peeled them off – I’m not sure if I like this effect but I do like the resulting coloured stickers!

sponging over stickers