Deflected double weave explorations

Ever since I first saw this deflected double weave scarf by Madelyn van der Hoogt, I’ve wanted to play with this version of the weave structure – the idea of interlocking yet distinct layers of weaving sparks my imagination.

screenshotIt seems to me like a metaphor for the layers of meaning and ‘otherness’ that intertwine through life, the ‘thin places’ and thresholds of enchantment I glimpse in the everyday. The original scarf is woven with a fine merino but I’m trying to use what I have whenever I can, so I chose some of my handspun yarn and adapted the draft to suit. I used unfulled handspun for this so there was plenty of scope for of felting shrinkage.

handspun yarn

The weaving is straightforward, the ‘layers’ alternate, and one layer weaves plain weave while the other floats. It goes relatively fast because of the size of the yarn and all the spacing. Spaced deflected double weave in progress

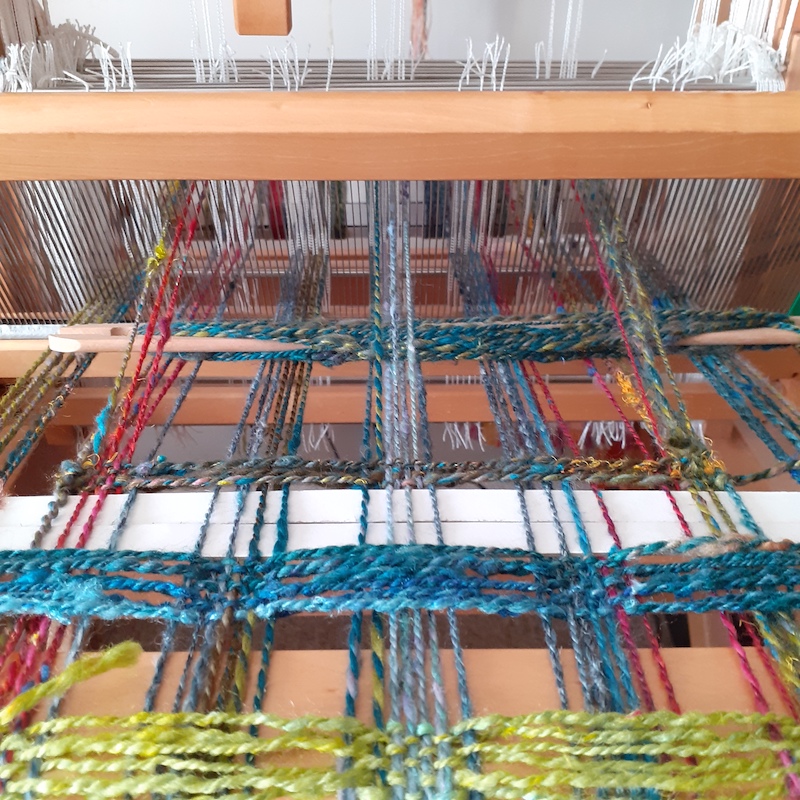
Off the loom, the weaving is quite fragile and needs careful handling to minimise movement of the yarns. The unfinished width off the loom is 25 – 28cm.

Spaced deflected double weave before finishing

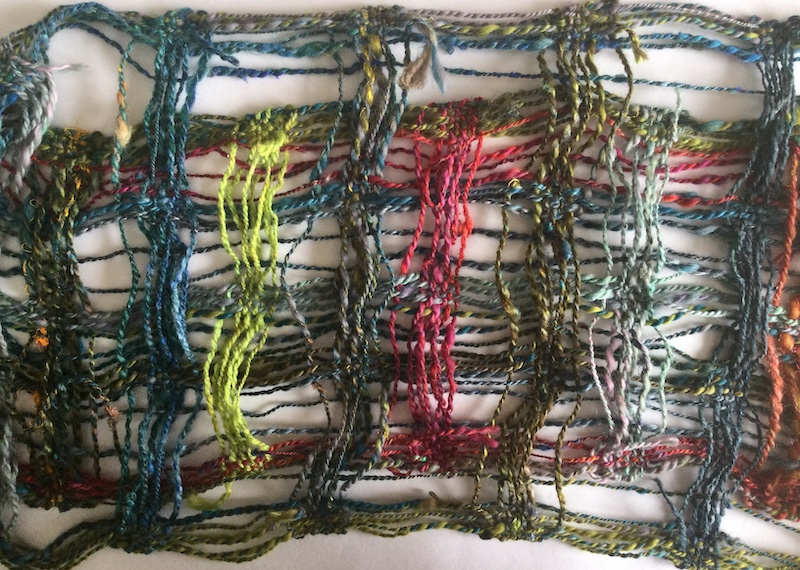
I divided it into 5 pieces to experiment with different ways of finishing it and these were the results. They don’t have a ‘right’ or ‘wrong’ side but the two sides are different because of the dominant direction of the yarns.

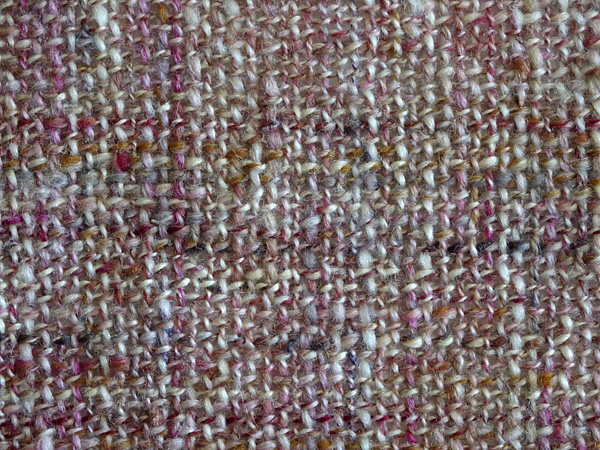
This first exploration was hand washed and I spent some time rolling some of the float areas between my palms to felt the yarns together. Felted and fulled. Finished width 16 – 17cm. The two layers stay separate, and the gaps are bigger so the layers move independently.

The second exploration was put into a washing machine with a normal load of washing and washed at 40 degrees on a quick wash setting. Felted and fulled. Finished width 14 – 15cm. The most densely felted and textural. The two layers stay separate but are closely integrated.

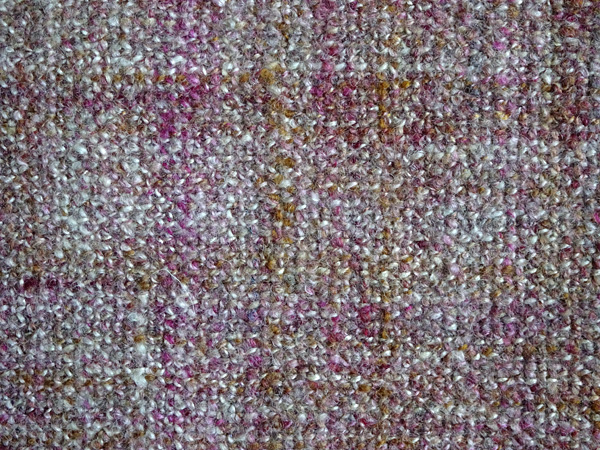
The third experiment was steamed (I have a washing machine with a steam setting – I haven’t tried steaming on the stove). Lightly felted and not fulled. Finished width 15 – 16 cm. The layers and the yarns stay separate. Very soft, squishy, and fluffy, rather than robust.

My fourth exploration was finished by rolling and rubbing using feltmaking equipment, the same way that felt is made from fibre. Felted but not fulled. Finished width 21 – 22cm. I decided not to full it as I like the way the yarn has felted into solid flat strips in place and didn’t want to shrink these further at this stage (maybe later or next time). The layers are largely separate but have felted together in a few places. I could probably avoid that by separating them more assiduously between rolling.

The last experiment is similar to the fourth but with the addition of some sari ribbon and sari yarn between some of the layers and using this nuno felt tumble drier technique, except that I used a warm setting so it would be possible to dry some washing at the same time. Felted but not fulled. Finished width 21 – 22cm. The layers are mostly either joined deliberately by the fabric or felted together by the process. I had less control in this one than in number four, and the yarns have also felted together a bit more and with more energy and crinkliness, all of which I like. And I love the effect of including the fabric.

So, with several interesting transformations, I’ve gained a much deeper understanding of this form of deflected double weave, and there’s still so much more left to explore.

Seeing double – weave explorations

It’s feeling very spring-like now in west Wales. I love this time of year with the blackthorn blossoming and the birds shouting their joy a little bit earlier every morning. For the last couple of months I’ve been on an online course with Cally Booker – Understand Double Weave on 8 Shafts. It’s been a delight and there’s so much more I want to explore. Cally is an excellent teacher with her own ways of seeing and explaining that somehow make everything fall into place.

Choosing colours was fun and I always love warping the loom, which is something I still need to practise – a lot!

We started out making panes and chequerboards with our blocks (only two double weave blocks  are possible on an 8 shaft loom – but what a lot you can do with them!). The colours on the top layer are reversed on the bottom layer, sometimes the ‘back’ is more exciting than the ‘front’.

Then we wove tubes and folds. You can use these techniques to make bags and containers. The choice of weft colour – the colour decisions you make as you weave – makes a huge difference to the colour of the cloth, and not always in the way you imagine.

After that we studied microblocks, pickup and padding. I had a lot of fun playing, padding the blocks with thrums (the ends that are left after you cut the weaving off the loom) and chunky twisted cords. Definitely something I want to revisit.

The next lesson explored more variations on the theme: weft interchange, introducing twill in one of the blocks and my favourite part – colour and weave effects.

By this point I was running out of warp, and the course had officially finished. The final lesson offers various suggestions for further exploration and the one that makes my heart beat a bit faster is double weave huck (huck is a lace weave). I haven’t yet woven huck at all, though, so my next learning project is to find out how to do that before I plunge into weaving it in two layers.

Ruly unruly weaving

This warp started as a deflected doubleweave draft from The Deflected Doubleweave Handbook, which accompanies a video by Madelyn van der Hoogt, adapted to the yarns I had on hand when I began it while staying with my sister and with limited supplies.

Deflected doubleweave is a weaving structure with separate yet interwoven layers where the movement of the yarns, once the cloth is off the loom and wet finished, creates new shapes, curves, even circles, and the front and back are different, sometimes very different.

When I picked it up again after arriving in Swansea, with a different limited set of supplies, I wandered away from the pattern, trying different yarns, using up bobbins and experimenting to see what would happen with different combinations of fibre and pattern.

I find the fibre interactions astonishing, what happens with the colours and the textures and how it can all shift into something so different. And even more than that, I am seeing so much potential in this weave as a metaphor for expressing the magical spaces that fascinate me – this world and the otherworld and the thin places between, those liminal borderlands and thresholds where one thing becomes another, the integration of images, ideas and emotions that seem to be in opposition but can be experienced as both/and, not either/or. What Rowan Williams calls ‘a layered and broken reality’. I’m nowhere near the technical mastery to embody any of this in the weaving yet, but I mean to practise all I can, till I am able to break (or keep) the rules through choice and not through ignorance; and to explore the debatable land a little further with every warp.

tree and moon

Weaving with mirrors – playful doubleweave

I have a doubleweave sampler on my table loom which I need to finish to free up the loom, and having gone through lots of exercises in the excellent book Doubleweave, by Jennifer Moore, I am playing now in a freestyle way with rags and scraps of yarn.

Doubleweave is woven in two layers, and it can be used to create a thick double cloth with both layers joined across the width, or it can be used to create a cloth that is wider than the width of the loom, by turning a corner at one edge so that the bottom layer is joined to the top layer all along that edge but nowhere else. Essentially you are weaving a piece of cloth that is folded in half and when it comes off the loom you can open it out to its full width.

Here I’ve decided to divide the warp into short sections, weaving each with a different weft, I have 7 sections across the top (green) layer and three across the bottom (rust) layer – I thought 3 was enough of a challenge on the bottom, which I can only see by bending double and craning my neck or using a mirror – and by feel – ‘seeing’ with my fingers. It’s slow but satisfying to watch this cloth taking shape, and I’m not sure what will happen next, just weaving in the moment is enough.

Doubleweave by Jennifer Mooreif you’re interested in the book I’ve been following, using this link helps to support my blog.

Wet finishing a handspun scarf

Until I began weaving I didn’t appreciate how much of a transformation the cloth undergoes after the weaving ends. Wet finishing is a magical process that I enjoy every time. Watch what happens with this tweed scarf that’s entirely woven with my handspun yarn.

On the loom

The warp yarn (end to end) is stretched, and I deliberately beat the weft yarn (side to side) lightly to create an open weave with lots of scope for shrinkage. This yarn, like much of the yarn I create for weaving, hasn’t been washed and set after spinning, so it hasn’t shrunk at all yet.

handspun scarf on the loom

Off the loom

Now I’ve cut the scarf  from the loom and it’s no longer under tension: notice how the yarns are distinct and you can still see through the weave.

Scarf cut from the loom showing open weave

Wet finishing

The next step is to wet finish the cloth. For these scarves, which are mostly wool with a little silk, I start by running a bowl of hot tap water with a small amount of wool wash and soaking the scarf for at least 15 minutes. Then I work the scarf vigorously in the water, squeezing and pummelling, just the opposite of how to hand wash a finished scarf! I lift it out often to see how the fabric is changing.

How long this takes depends on how fulled I want it to be. I’m looking for a change, from individual yarns that move separately, to a surface where all the yarn looks bedded together and the cloth moves as one. At that stage I rinse in cold water, then hot, agitating it more, and repeat as needed – watching the fabric carefully all the time. This is to shock and shrink the fibres further, just like fulling felt. You can always full it more if the finished cloth isn’t quite what you are aiming for, but you can never ‘unfull’ it, so it’s important to pay attention to what is happening or the fabric will get too solid and lose its drape.

Once the scarf has reached the texture I want, I stop fulling and place it into a bowl of lukewarm water with a splash of vinegar to neutralise any remaining wool wash. Then a final rinse at the same temperature, squeeze out the water gently, roll in a towel to absorb as much moisture as possible, and hang to dry at room temperature.

This is the cloth after wet finishing: see how the yarn has bloomed and shrunk, closing the gaps to form a textural, nubbly cloth. You can still see through it a little, but only if you hold it up to the light.

Handspun scarf after wet finishing

Ironing

Once the scarf is dry or almost dry, the final step is to iron it. This creates the lovely tweed surface, bringing out the sheen of any silk or lustrous wool I may have used. After this I can really say the scarf is ‘finished’. I use a steam iron on the hottest setting (with a pressing cloth to protect the woven fabric) and press as hard as I can all along the length; then turn it over and do a lighter press on the other side.

Handspun, handwoven scarf after wet finishing and ironing

The result!

And the finished scarf is now ready to wear.

Handwoven, handspun scarf by Fiona Dix